由于种种原因,我们之前使用了Xen,但使用起来不是很方便,例如有时物理机上的LVM并不会开机激活等,我们就想着集中迁移到VMware进行集中管理
1 环境说明
- Xen虚拟机为全虚拟机化,就是内核是没有修改的,此处主要影响硬件驱动,如果用的是半虚拟化,估计转换后,还要处理下initrd文件
- 虚拟机里的系统使用了LVM(特别坑)
2 export to ovf
失败
导出后,在导入VMware的时候,提示
encoding specified in XML declaration is incorrect对于上述错误,有人在VMware论坛提出了解决方案:Xen -> VirtualBox -> VMware
1)Exported OVF and VHD from Citrix XenCenter

2)Created a new VM in Oracle VirtualBox using as virtual disk the VHD disk exported above. (this step was performed on my desktop pc on which I installed VirtualBox)

3)Exported OVA from Oracle VirtualBox

4)Imported OVA as an Assembly in vSphere
满心欢喜,进行了16个小时的导出后,在导入的时候,并不行,提示硬件不兼容,放弃
3 P2V
就是用物理机转换为虚拟机的方法,可行
我们在转换的时候,转换工具可以识别到源机的磁盘结构(LVM), 但转换过去后,磁盘大小却不对,结构也是乱的,猜测是LVM导致,这里有提到一个将LVM降级的解决办法,但我们没有试,主要是考虑
- 数据安全,将LVM降级,怕有风险
- 文章发表时间为2013年,较旧
- VMware官方文档也表示转换工具支持LVM
文档地址:Solution for LVM based Linux servers using VMware Converter showing no volumes
下面讲可行的方法
步骤一
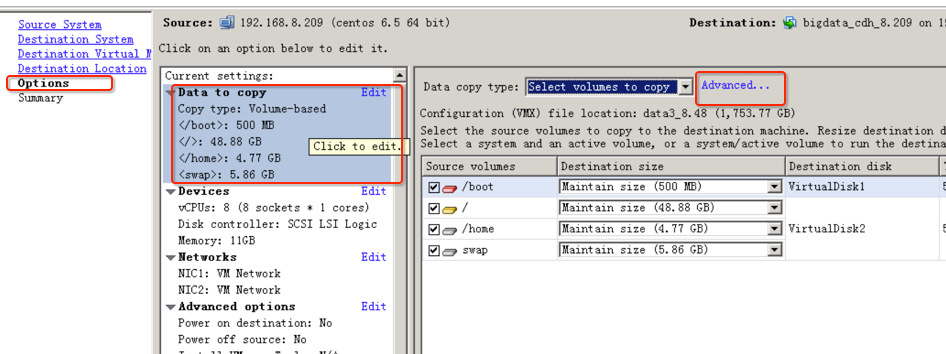

在「Optinons」这一步,点击「Data to copy」部分内容,或者点击「Edit」,然后选择「Advanced」,然后去到下图
步骤二
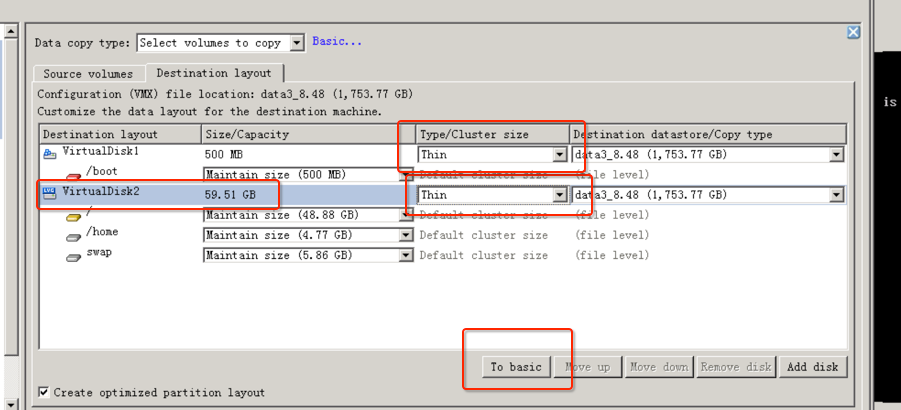

此处选择「Destination layout」,点击「VirtualDisk2」,然后点击「To basic」,就是在目标机器上不使用LVM,只使用普通磁盘分区,此处为关键
至于另外2个「Thin」,则可设置,也可以不设置,设置为Thin就是按需占用,按实际使用分配,而不是一下子就分配所有空间
步骤三
Xen服务器上的虚拟机转成VMware的虚拟机后,发现开机黑屏,最后摸索后发现是grub菜单项有问题导致,在开机的时候,直接修改grub菜单,然后把consolse=hvc0删掉,并在最后加入fastboot,就可以正常启动了
步骤四
由于转换的时候,没有识别到/data,我怀疑是因为它磁盘设备文件是/dev/xvdb导致,一般应该是/dev/xvdb1,所以,我们在开机后,添加新磁盘,然后在线同步一次data,最后,关闭所有服务,再同步要同步的数据,本例中含/var和/data,最后换ip,开启服务,迁移完成