因为好奇,想学点新东西,所以有了一点断断续续的测试,还有本文
GPU有多强
以Nvidia GT 740为例,500块左右,有384个核,而目前台式机,强劲的i7也只有4核8线程啊,所以显卡非常适合做并行计算。
对于服务器级别的,如Nvidia的K或者M系列,核数则可以去到2000-4000,当然价格也比较感人,上万块。
再来看一点亲测的数据,一个6位包含小写字母和数字的Linux密码,用CPU和GPU去破解,他们之间的耗时
# GPU
time ./john --format=sha512crypt-opencl ~/passwordsdb
# CPU
time ./john ~/passwordsdb| 处理器 | 时间(分钟) |
|---|---|
| GPU | 34 |
| CPU | 170 |
应用领域
目前已经有云供应商提供GPU计算服务,我们大概可以把GPU运算应用于
- 各种Crack
- 深度学习,如Caffee
- 挖矿
并行计算标准
- CUDA,Nivia only,官网提供了Win、Linux、MAC全平台的工具包
- OpenCL,苹果推出,兼容Nivdia、AMD、Intel,据查资料,部分ARM架构的GPU也支持
Kali
大名鼎鼎的安全发行版,版本是「kali-linux-2016.1-amd64.iso」
安装Nivdia工具
apt-get -y install nvidia-cuda-toolkit libssl-dev
# 列出显卡
nvidia-smi -L
# 以下为上面的指令输出
GPU 0: GeForce GT 740 (UUID: GPU-8c5c127a-1628-f75e-bde2-61b202fe83b3)
如果安装不成功,也可以参考下面的文档继续折腾下,在线安装比较卡,推荐另外一个源
Install NVIDIA Drivers on Kali
vim /etc/apt/sources.list
#中科大kali源  推荐,快
deb http://mirrors.ustc.edu.cn/kali kali-rolling main non-free contrib
deb-src http://mirrors.ustc.edu.cn/kali kali-rolling main non-free contrib
deb http://mirrors.ustc.edu.cn/kali-security kali-current/updates main contrib non-free
deb-src http://mirrors.ustc.edu.cn/kali-security kali-current/updates main contrib non-free
安装JohnTheRapper
john比较智能,不需要指定密码组成字符集就可以运行,它会先用single-mode,然后是wordlist with rules,最后是incremental mode
Kali自带John,但不支持GPU,所以需要手工安装一个
# 需要用github上的最新版,否则编译报错
cd /dist/src
git clone https://github.com/magnumripper/JohnTheRipper.git
cd JohnTheRapper
# 默认不开启CUDA,需要显式开启,不过意义不大,因为在OpenCL下比CUDA更快
./configure --enable-cuda
make -s -j 5
cd ../run
列出OpenCL设备
# 列出OpenCL设备
./john --list=opencl-devices
Platform #0 name: NVIDIA CUDA, version: OpenCL 1.2 CUDA 7.5.23
    Device #0 (0) name:     GeForce GT 740
    Device vendor:          NVIDIA Corporation
    Device type:            GPU (LE)
    Device version:         OpenCL 1.2 CUDA
    Driver version:         352.79 [recommended]
    Native vector widths:   char 1, short 1, int 1, long 1
    Preferred vector width: char 1, short 1, int 1, long 1
    Global Memory:          1023.10 MB
    Global Memory Cache:    32.0 KB
    Local Memory:           48.0 KB (Local)
    Max memory alloc. size: 255.2 MB
    Max clock (MHz):        1058
    Profiling timer res.:   1000 ns
    Max Work Group Size:    1024
    Parallel compute cores: 2
    CUDA cores:             384  (2 x 192)
    Speed index:            406272
    Warp size:              32
    Max. GPRs/work-group:   65536
    Kernel exec. timeout:   yes
    PCI device topology:    01:00.0
列出CUDA设备
./john --list=cuda-devices
CUDA runtime 7.0, driver 7.5 - 1 CUDA device found:

CUDA Device #0
    Name:                          GeForce GT 740
    Type:                          discrete
    Compute capability:            3.0 (sm_30)
    Number of stream processors:   384 (2 x 192)
    Clock rate:                    1058 Mhz
    Memory clock rate (peak)       2500 Mhz
    Memory bus width               128 bits
    Peak memory bandwidth:         80 GB/s
    Total global memory:           1023.10 MB
    Total shared memory per block: 48.0 KB
    Total constant memory:         64.0 KB
    L2 cache size                  256.2 KB
    Kernel execution timeout:      Yes
    Concurrent copy and execution: One direction
    Concurrent kernels support:    Yes
    Warp size:                     32
    Max. GPRs/thread block         65536
    Max. threads per block         1024
    Max. resident threads per MP   2048
    PCI device topology:           01:00.0
测试破解密码
Linux
不同版本的Linux,所用加密方式不一样,可以用下面的指令查看Linux系统的加密方式
grep ^ENCRYPT_METHOD /etc/login.defs
# 输出
ENCRYPT_METHOD SHA512
# 将用户名和hash后的密码整合下
unshadow /etc/passwd /etc/shadow > ~/passwordsdb
# OpenCL
./john --format=sha512crypt-opencl ~/passwordsdb
# CUDA
./john --format=sha512crypt-cuda ~/passwordsdb
# 再次查看破解后的密码
./john --show ~/passwordsdb普通MD5
# GPU
time ./john --format=raw-MD5-opencl ~/md5_password.txt
time ./john --format=raw-MD5 ~/md5_password.txt
MAC
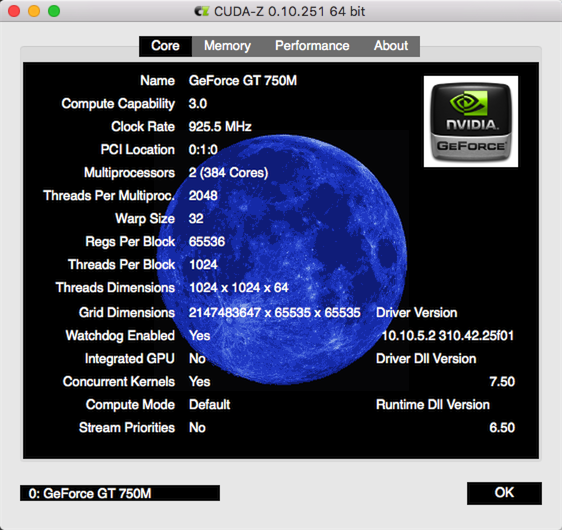
去官网找到对应的dmg下载安装即可,有一个CUDA-Z的工具,可以检测到CUDA设备
测试破解
# 密码构成字符集
echo -n 'abcdefghijklmnopqrstuvwxyz0123456789' > charsets/charsetall
# md5后的密码
echo -n 'e99a18c428cb38d5f260853678922e03' > test_hashes/Hashes-MD5.txt
# 开始破解
./Cryptohaze-Multiforcer  -h MD5 -c charsets/charsetall -f test_hashes/Hashes-MD5.txt --min=4 --max=9
其他
Kali上的信息查看工具
glxinfo
如果glxinfo提示direct rendering为yes说明显卡3D加速已经激活
glxinfo |grep -i 'direct rendering'
# 以下为输出内容
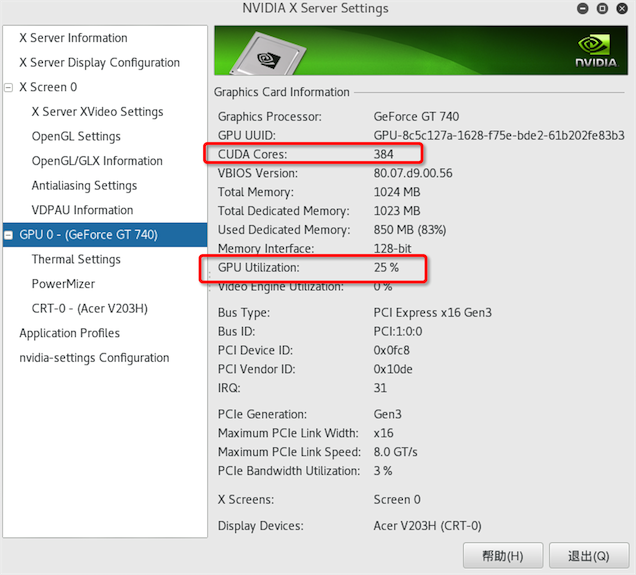
direct rendering: Yesnvidia-settings
可以看到很详细的信息,包括GPU核心数,当前负载
apt-get install nvidia-settings
# 直接运行
nvidia-settings
请看图